
Virtual machines (VMs) provide a versatile environment for testing, development, and learning new software without risking your main system’s stability. Microsoft’s Hyper-V, integrated into Windows 11, offers a robust platform for virtualization, allowing developers to configure isolated environments for various projects. This guide will walk you through the steps to enable Hyper-V and quickly create a “Windows 11 Development Environment” VM using the Quick Create feature.
Enabling Hyper-V in Windows 11
Step 1: Prerequisites Check
Before enabling Hyper-V, ensure that your system meets the following requirements:
- Windows 11 Pro, Enterprise, or Education
- CPU with support for Second Level Address Translation (SLAT)
- CPU support for VM Monitor Mode Extension (VT-c on Intel CPUs)
- Minimum of 4GB RAM
If your computer doesn’t have Virtualization Enabled, check How to Enable Virtualization on BIOS: A Step-by-Step Guide for AMD and Intel Chipsets.
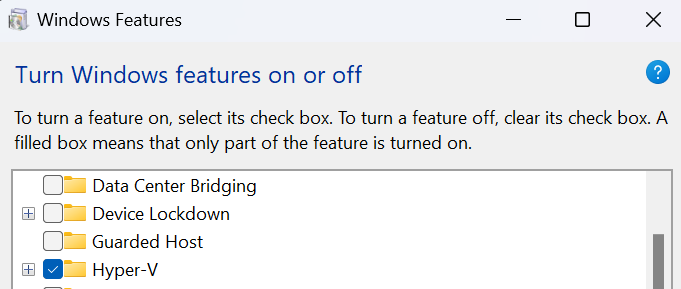
Step 2: Enabling Hyper-V using Windows Features
- Open the Start Menu, type “Turn Windows features on or off”, and press Enter.
- Scroll down to “Hyper-V” and check all boxes under it.
- Click “OK” to install the features. You may need to restart your computer to complete the installation.
Creating a Virtual Machine Using Quick Create
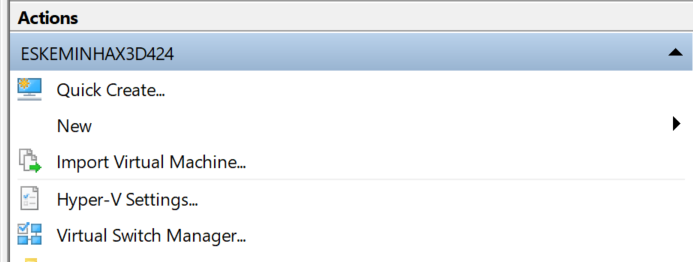
Step 1: Launch Hyper-V Manager
- In the Start Menu, search for “Hyper-V Manager” and open it.
- In the Hyper-V Manager, click on your computer’s name on the left-hand side.
Step 2: Quick Create a New Virtual Machine
- Click “Quick Create” in the right-hand side panel.
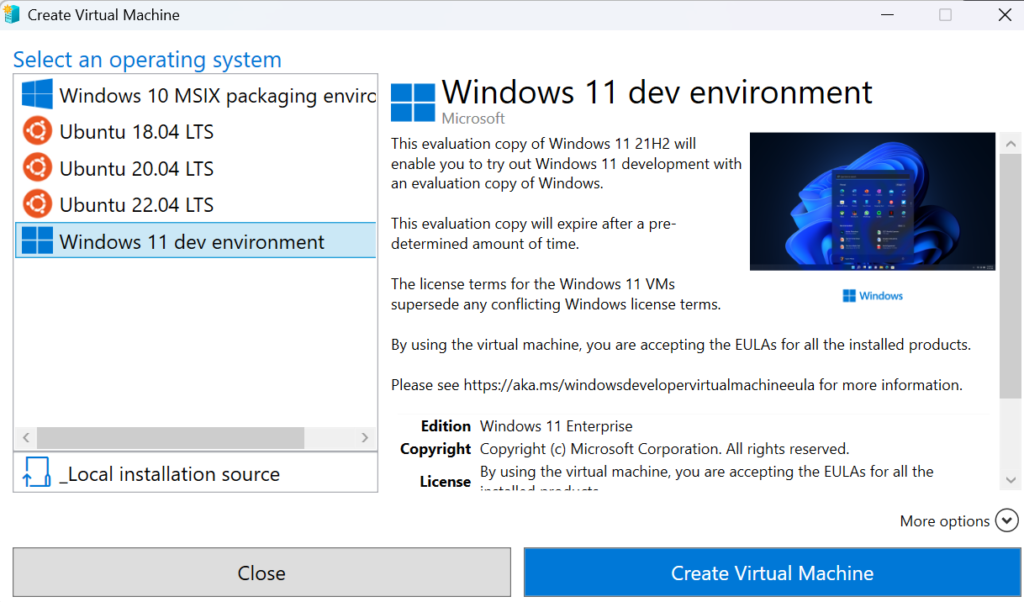
- A new window will appear where you can select the “Windows 11 Development Environment” from the list of available operating systems.
Step 3: Configuring and Launching the Virtual Machine
- After selecting “Windows 11 Development Environment”, click “Create Virtual Machine”.
- Hyper-V will automatically configure the virtual machine with default settings optimized for development. You can modify settings like RAM and virtual CPUs if needed.
- Once configured, click “Start” to boot up your new virtual machine.
Step 4: Completing the Windows 11 Setup
- Follow the on-screen prompts to complete the setup of Windows 11.
- After the installation completes, you can install any necessary development tools and applications.
Final thoughs
Enabling Hyper-V and setting up a new virtual machine in Windows 11 can significantly enhance your development capabilities. The Quick Create feature simplifies the process, allowing you to get your development environment up and running in no time. Regular backups and updates are recommended to keep your virtual machine running smoothly.
As a developer, I personally use Hyper-V extensively to safeguard my main system from potential slowdowns and disruptions caused by experimental software and development processes. By isolating development environments in virtual machines, I can ensure that my primary operating system remains fast and responsive, while still pushing the boundaries of software testing and development. This approach not only boosts productivity but also adds an extra layer of security, keeping the main system clean and efficient.